Learn how to fill cracks in wood with expert techniques and tools in 2025. From wood filler to epoxy, fix cracks easily and restore your furniture today!
Introduction: Why Wood Cracks—and Why It Matters
Cracks in wood are more than cosmetic flaws—they signal damage that can worsen over time. Whether it’s your favorite coffee table, a hardwood floor, or a valuable antique, wood cracks can devalue and deteriorate the item if left untreated.
Fortunately, learning how to fill cracks in wood isn’t just a professional skill anymore—DIYers and homeowners can now easily handle these repairs using affordable tools and techniques. With the rise of new, eco-friendly fillers and more durable materials in 2025, restoring cracked wood is easier than ever.
In this guide, you’ll learn:
- The types of wood cracks and what causes them.
- The best fillers for different wood types and damage levels.
- Step-by-step instructions for effective, lasting wood crack repair.
- Tips for staining, sealing, and preventing future damage.
Let’s jump into the world of wood crack repair and save your wood furniture or flooring—beautifully and permanently.
What Causes Cracks in Wood?
Understanding why wood cracks helps you prevent and properly treat future damage.
1. Natural Aging and Drying
As wood dries over time, it naturally contracts. This shrinkage causes tension within the grain, which leads to cracking—especially in hardwoods like oak or maple.
2. Humidity Fluctuations
Wood is hygroscopic, meaning it absorbs and releases moisture. Sudden humidity changes cause expansion and contraction, which often results in splitting.
3. Improper Storage or Installation
Poor wood seasoning, bad joinery, or installing wood without climate acclimation can result in stress that eventually leads to cracks.
4. Heavy Usage and Pressure
Overloaded furniture or wooden flooring in high-traffic areas often develop pressure-related cracks.
How to Fill Cracks in Wood (Step-by-Step)
Step 1: Identify the Crack Type
| Crack Type | Description | Recommended Repair |
|---|---|---|
| Hairline | Very thin cracks, usually surface-level | Wood filler or CA glue |
| Surface Cracks | Slightly wider but not deep | Putty or filler |
| Deep Cracks | Wide or structural splits | Epoxy or filler with support |
| Gaps in Joints | Visible openings at joins | Filler or glue + clamps |
Step 2: Select the Right Product
Here are the most common wood crack fillers and when to use them:
| Product | Best For | Pros | Cons |
|---|---|---|---|
| Wood Putty | Small surface cracks | Easy to apply, cheap | Not stainable, not good for large cracks |
| Wood Filler | Moderate cracks | Paintable & sandable | May shrink slightly |
| Epoxy Resin | Deep/structural cracks | Strong, durable | Takes time to cure, hard to stain |
| Sawdust + Glue Mix | Visible wood repair | Color matches | Not suitable for large cracks |
| CA Glue with Dust | Hairline gaps | Fast-drying | Not flexible or stainable |
✅ Tip: For outdoor use, choose waterproof or exterior-grade products.
Step 3: Clean the Area
- Use a vacuum or brush to remove dust and debris.
- If needed, use isopropyl alcohol to clean oily residues.
- Ensure the area is completely dry.
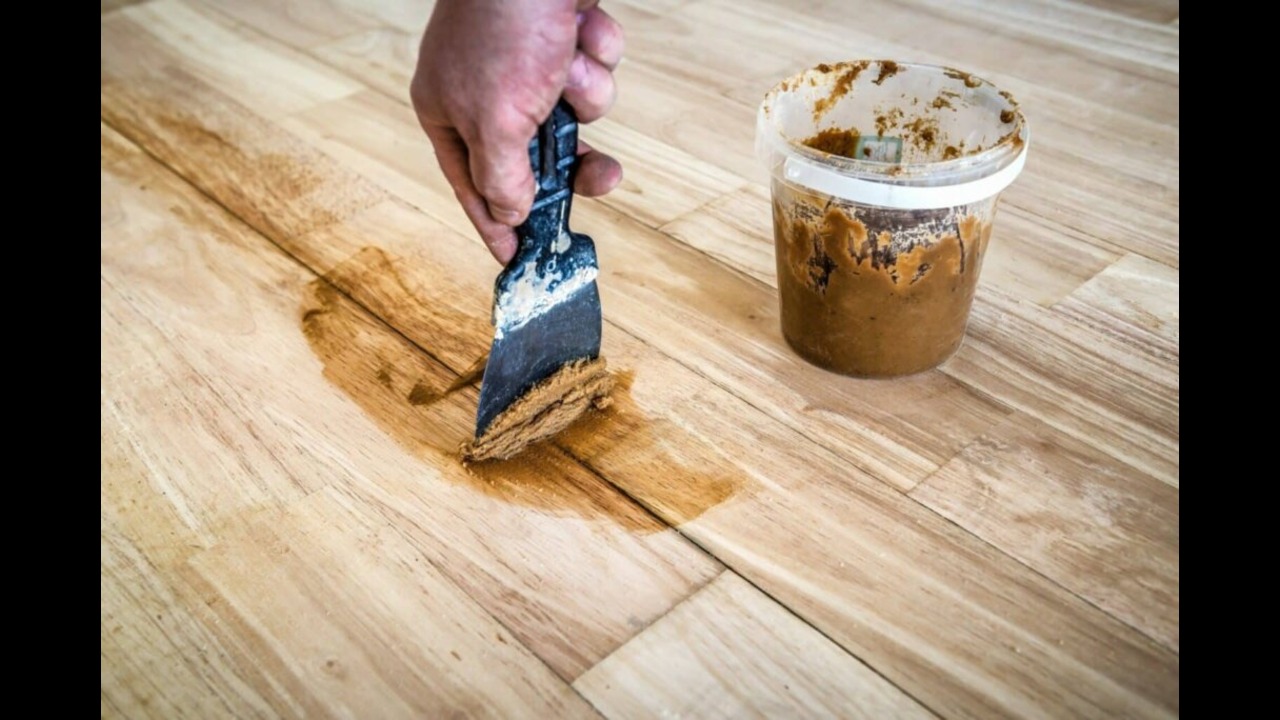
Step 4: Apply the Filler
- For wood filler or putty: Use a putty knife to press material into the crack.
- For epoxy: Mix as directed and pour or inject it into the crack.
- For sawdust + glue mix: Collect sawdust from the same wood, mix with glue into a paste, and apply.
Step 5: Let It Cure
Follow product-specific drying times:
- Wood filler: 30 mins to 1 hour
- Putty: Often dries within 30 mins
- Epoxy: May require 12–24 hours
Step 6: Sand the Area
- Sand using fine-grit sandpaper (120–220 grit).
- Sand until smooth and flush with surrounding wood.
Step 7: Stain or Finish
- Apply stain or paint if needed to match.
- Finish with varnish or polyurethane for protection.
Best Wood Filler Products in 2025
| Brand | Product | Type | Use Case | Estimated Price |
|---|---|---|---|---|
| Minwax | High Performance Wood Filler | Filler | Furniture, floors | $8–$12 |
| Timbermate | Water-Based Wood Filler | Filler | Indoor use | $10–$14 |
| J-B Weld | KwikWood Epoxy Putty | Epoxy | Large/deep cracks | $7–$10 |
| TotalBoat | Epoxy Kit | Epoxy | Outdoor, structural repair | $35–$50 |
| Elmer’s | Carpenter’s Wood Filler | Filler | Light duty fixes | $5–$8 |
Use Cases: Filling Cracks in Different Wooden Items
1. Furniture
Use color-matching filler for seamless repair, then stain to match the existing finish.
2. Flooring
Use flexible, durable filler that handles seasonal expansion.
3. Cutting Boards
Only use food-safe fillers like beeswax or mineral oil mixes.
4. Decking
Use exterior-grade epoxy or filler that resists moisture and UV damage.
Advanced Techniques: Pro Methods for Flawless Wood Crack Repair
While most homeowners are comfortable with standard fillers, professionals often go a step further. If you’re aiming for flawless restoration, consider these advanced wood crack repair techniques:
1. Dutchman Patch (Inlay Repair)
For wide or irregular cracks in high-value wood pieces, pros often cut a small, matching wood patch (called a Dutchman) and inlay it into the damaged area.
- Best For: Antique furniture or decorative wood
- Pros: Seamless blend with grain direction, extremely durable
- Cons: Requires chiseling and precision tools
2. Bowtie or Butterfly Keys
These wooden inlays are both decorative and functional. They’re embedded across the crack to prevent further splitting, often used in live-edge tables.
- Best For: Rustic or live-edge wood slabs
- Tools Needed: Router, template, chisels
3. Layered Epoxy Pouring
For deep or uneven voids, apply epoxy in thin layers. This prevents heat buildup and air bubbles. You can even tint epoxy with wood pigments or metallic powders for artistic finishes.
- Pro Tip: Use a heat gun between layers to release air bubbles.
Common Mistakes to Avoid When Filling Wood Cracks
Even DIY veterans can make costly mistakes. Avoid these pitfalls to ensure a long-lasting repair:
❌ Skipping Surface Prep
Failing to clean and sand the crack area leads to poor adhesion. Always remove dirt, loose wood, and oils before filling.
❌ Using Interior Filler Outdoors
Interior-grade fillers will crack or dissolve when exposed to moisture. Always check the label and opt for exterior-rated or waterproof products.
❌ Overfilling the Crack
Too much filler can bulge and crack upon drying. Apply in layers for deeper cracks.
❌ Not Sanding Properly
Uneven sanding creates visible edges that absorb stain differently. Always feather the edges for a seamless blend.
❌ Applying Stain Before the Filler Dries
Always wait for the filler to fully cure before staining or sealing, or you risk uneven color and weak durability.
Eco-Friendly Alternatives in 2025: Sustainable Crack Fillers
With increasing demand for eco-conscious home improvement, 2025 has brought sustainable filler innovations to market:
| Product | Eco-Feature | Use Case |
|---|---|---|
| EarthFill Natural Wood Filler | Plant-based, biodegradable | Indoor repairs |
| Osmo Wood Putty | Low-VOC, oil-based | Furniture restoration |
| Bio-Epoxy | Renewable resin system | Outdoor crack repair |
✅ Why it matters: These eco-friendly options are safer for you, your family, and the planet—especially important for indoor or food-contact surfaces like cutting boards or toys.
Staining Tips: Get a Perfect Color Match After Repair
Filling the crack is only half the battle—color matching ensures the repair vanishes into the wood grain.
🔸 Use Stainable Fillers
Make sure the label says “stainable.” Test on scrap wood first to ensure it absorbs evenly.
🔸 Layer Your Stains
Apply multiple thin coats, feathering out into the surrounding wood.
🔸 Use Gel Stains for Better Control
Gel stains don’t penetrate too deeply, which helps match the filled area more accurately.
Quick Reference: Crack Type to Filler Matching Table
| Crack Type | Recommended Product | Location |
|---|---|---|
| Hairline surface crack | CA glue or gel filler | Trim, baseboards |
| Medium gap (1/8”) | Stainable wood filler | Tables, cabinetry |
| Wide/deep crack | Epoxy or patch inlay | Tabletops, beams |
| Outdoor crack | Waterproof epoxy or putty | Decking, siding |
Call-to-Action (Enhanced)
DIY Example: Fixing a Cracked Teak Coffee Table
- Problem: A 6-inch long, 1/8-inch wide crack.
- Solution:
- Cleaned the area.
- Mixed teak sawdust with Titebond glue.
- Filled the crack and let it dry for 24 hours.
- Sanded flush and applied Danish oil.
- Result: Nearly invisible crack, preserved natural color.
Prevention Tips: How to Avoid Cracks in the Future
- Use humidifiers indoors during dry seasons.
- Seal all wood with a protective finish.
- Don’t expose wood to direct sunlight or moisture.
- Store wood flat and let it acclimate to room climate before use.
- Avoid putting heavy loads on softwood furniture.
Internal Links
Trusted External Sources:
Suggested Visuals
- Photos of before/after repairs
- Table comparing filler types
- Infographic of repair steps
- Video: “How to Repair Cracked Wood Furniture”
Conclusion: Seal the Crack, Save the Wood
Fixing wood cracks may seem intimidating at first, but with the right knowledge and materials, anyone can do it. Whether it’s a minor surface flaw or a deep structural split, you now know how to fill cracks in wood like a pro.